Day One National Stationery Week – Pen and Paper Day

natstatweek

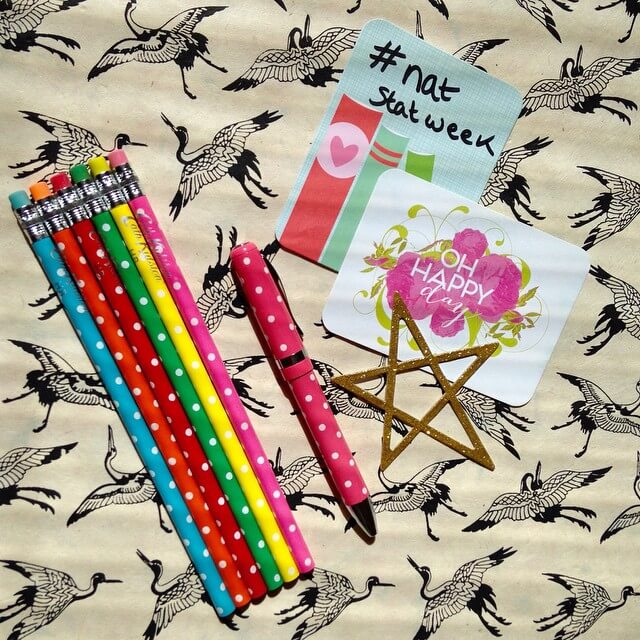
National Stationery Week kicks off today with Pen and Paper Day and I’m working from home using these Cath Kidston pieces and writing a training plan for work I’m starting this summer.

I made some notes earlier this week mulling over why I think it’s really important that we continue to value the handwritten over word processing and I think I’d sum this up by saying handwriting brings a personal touch, allows me to be more reactive as I always have a pen and paper to hand and keeps my mind sharp too.

There are five things that I think we can all try to #keepbritainwriting

natstatweek1

1) Keep a paper diary

I write in a journal most days, reflecting on the day, hand writing this means I take the time to think about the words before I write them down, mulling over the positives and negatives of the day, counting my blessings and planning for the future

2) Sending handwritten notes

I love nice note paper and these Project Life cards in the photos above are a new thing for me, I use the double sided ones to send notes to friends, leave notes for the family and it generally brings me joy to work with nice paper, so they bring colour to the mundane too!

3) Write notes for work/study by hand

I never make meeting notes onto a tablet or laptop if I can help it, I write quicker capturing more by hand, the nuances of conversation are missed when I type too, so I like to note interviews down on paper with a trusty biro

4) Write for your children

J can’t write yet but is interested in letters and numbers, we draw together but I also write for her too, it’s a lovely bonding exercise as I want for her to love to read and write too

5) Use a paper planner

More on this later in the week, but since returning to an old fashioned paper planner with stickers and colour coding I feel much better organised and I definately keep it better updated than the days where I kept scrappy notes to pop into Outlook at a later (never!) time

Do you value the handwritten? Why?

How to create a Fairytale Terrarium (with Totoro)

I bought this Terrarium for our glass wedding Anniversary and since then it’s taken on several looks, most recently I gave it a good clean and added some new sempervarium. When I set up this little styled shot J got interested too “I like lots of little trees in there Mammy”

terrarium

I had been saving some bits and bobs spotted on my travels for a summertime outdoor fairy garden but decided to make our little terrarium a fairytale garden instead, we’ve gone with a Studio Ghibli Totoro theme as this is currently a big fave with the whole family!

totoro terrarium1

How to create a Fairytale Terrarium (with Totoro)

1) Take your terrarium (you can use a large glass mason jar, old clear glass teapot or a classic terrarium like ours) and add a 2 inch layer of pebbles to the bottom of the container for drainage (I use fresh fish tank gravel)

2) Then add a half inch layer of activated charcoal over the pebbles (available at Wilko or garden centres) this helps keep bacteria at bay and keeps your terrarium smelling sweet

3) Add damp but not soggy potting soil and plant up your succulents, cacti etc and finish with a fine sprinkle of gravel, I use a chopstick to adjust the plants as it’s a narrow space at the back!

4) Add pretty stones, I added sea glass but you can pick up other pretty pieces of stone or use coloured gravel

5) Add your characters and other ephemera; I added a miniature wire cherry tree I bought at a garden centre, a small white plastic bridge that turned up in a kinder egg type Easter gift, and some small Totoro and Mei figurines, finally J added her Lego Monkey (why not?!) and a small house I bought on Ebay with the fairy garden in mind!

totoro terrarium3

Crafter’s Companion Easter Wreath Make

The challenge

The lovely folks at Crafter’s Companion set me a little Easter challenge, to make an Easter wreath using some goodies they sent me in the post. I love a craft challenge, and haven’t done anything creative for a few weeks so I took up the mantle, and here are the results!

IMG_4497

Supplies

  • A cut out cardboard ring (I made my own by drawing around two different sized plates and cutting out carefully with scissors
  • Two different coloured ribbons (I used a spring green and cream)
  • Collal tacky glue and Collal all purpose glue
  • Crafter’s Companion Centura pearl card pack
  • Patterned paper flowers
  • Buttons

index

Easter Wreath Make: How to

  1. Secure your ribbon to the back of the wreath with a little all purpose glue, then wind the ribbon around until you’ve covered just more than half of the wreath. Switch to your second colour ribbon until the wreath is completely ribbon-wrapped.
  2. Add another length of ribbon using all purpose glue to make a loop to hang your wreath
  3. Cut out your flowers from patterned paper (I used a printable) and cut out some rough leaf shapes from pearl card stock. Assemble your flowers in layers with tacky glue and pop a button in the centre of some of them to add to the 3d effect, stick the leaves to the back of each flower
  4. Assemble your wreath by gluing the flowers into position slightly off to one side of the lower wreath
  5. Cut some ribbon shapes from pearl card and assemble with tacky glue. I cut a large ribbon shape, a smaller copy in a contrasting colour, then assembled a simple 3d bow by gently folding the card stock to make the ribbon ‘stand out’ – a final loop of card to cover the centres of the ribbons finished off the look – again I used tacky glue to affix to the wreath

The finished piece!

I have hung my Easter wreath onto a piece of willow branch, with some contrasting coloured paper eggs to add to the festive feel! I’m really happy with the finished result – thanks Crafters Companion for providing me with the materials and the inspiration for this eggstra special make (no more Easter puns now, I promise!!)

IMG_4504 IMG_4516

Washi tape beach huts

washi tape beach hut

This one does what it says on the tin, it’s a swift tutorial using washi tape, I know it’s winter but I’ve made a stack of these using different tapes and am going to string them onto bunting for in J’s bedroom, there’s something really jolly about stripy beach huts, whether using traditional blue and white tapes or something a bit jazzy like this one!

How to make washi tape beach huts

Make yourself a beach hut template (essentially a rectangle with a triangle on top!) and draw around it onto plain card.

Use your tapes to fill out the design, hoops work well but any design would work really! You can overlap the tape and be quite rough with it as long as you cover the hut shape.

Finish the hut by using a wide tape in a contrasting colour to make the ‘roof’

Decorate as you wish, I used wide blue tapes to make a door and windows and decorated with a sharpie, a button and some washi curtains and a gold ‘rope’ effect embellishment.

Cut out your beach hut and use as a card topper, as bunting or a jolly postcard!


Chinese New Year Toddler Paper Fish Kite

chinese new year toddler kite

Newcastle’s Chinatown lies in the historic heart of Newcastle in Grainger Town and we use the Chinese supermarket down there a couple of times a month. I’ve always loved Chinese New Year, the street parade and fire crackers, and last year J visited with her Daddy and loved it too, coming home with fortune cookies and a paper dragon and a big smile on her face.

This year we’ve made some lanterns but I’ve seen lots of tutorials about those, we decided to make a paper kite this week and I’ve shared some step by step instructions below, with lots of room for artistic license. For J this activity was about a new skill, paper scrunching and sticking, so she made the scrunched paper cuff whilst I assembled the main body of the fish.

chinese new year toddler kite 2

Chinese New Year Toddler Paper Fish Kite – step by step

You need:

An empty toilet roll

Three sheets of tissue paper in different colours

Plain white paper

Glue

String/thread

Scissors

How to (tots)

Set them away with a sheet of paper and scraps of tissue paper and show them how to scrunch and stick the tissue down to make a cuff to decorate the fish. Adding glitter is always popular with toddlers! When finished attach the cuff to the fish with tape

How to (grown ups/older children):

Take a large sheet of tissue paper and place the toilet roll inner at the top left of the sheet, then roll the inner to cover it in tissue paper, secure with glue or tape, this forms the mouth of the fish, at the other end make a tail by cutting a deep v.

Decorate the body of the fish by wrapping with strips of different coloured tissue paper and tape/glue in place.

Cut fins from tissue and attach them to your fish

Cut and attach circle shapes for the eyes

Cut long strips of tissue to form the tail pieces and attach inside the tail with glue

Finish by carefully punching two holes in the top of the fish (in the toilet roll inner) to attach a string to ‘fly’ your kite!


Displaying beachcomber finds

Displaying beachcomber finds

Finally I got round to doing something with the beachcombed finds we brought back from holiday in Druridge Bay late last summer. As we started our little hoard and Joss sat playing ‘shell shopkeeper’ on the beach I thought we should bring some home as souvenirs but it wasn’t until we got home and I photographed them that I realised how many we had!

Displaying beachcomber finds

I scoured Pinterest for ideas and settled on a simple glass jar for our bathroom window, TK Maxx came up trumps with this beauty for less than a tenner and I really love how it turned out after some careful curating. I saw lots of other ideas but felt they might detract from the natural beauty of the shells, displaying beachcomber finds is easy if you let the treasures do the talking!

Displaying beachcomber finds

Displaying beachcomber finds

That teeny tiny shell dangling from the top is smaller than my little fingernail and in perfect shape, Joss found it for me and I loved how perfect it stayed despite its tiny size, I may pinch it back and pop a jump ring on it to wear on a necklace from time to time!

Displaying beachcomber finds

So there we have it, happy memories captured to enjoy back home!

Egg Carton Christmas Trees

egg carton christmas trees

Joss and I have been getting crafty most evenings for the last week. After dinner we clear the table and she asks to draw, once she tires of another round of drawing pigs and slugs (it’s always pigs and slugs she draws, I don’t know why!) she usually asks if we can do some painting.

I thought we’d use this time to start to make a few little Christmas decorations together. As I was clearing the kitchen last night I was about to pop the egg carton into the bin when I thought about using it for painting instead. Cutting out the centres of the carton I made some of them taller and some shorter and trimmed any rough edges before letting Joss go crazy on them with the glitter and paint!

Make your own Egg Carton Christmas Trees

If you’d like to make your own egg carton trees here’s the lowdown:

egg carton christmas tree

  • Cut out the pointed centres of your carton, remove any rough edges and prep them for your toddler by cutting them into different sizes.
  • Get decorating with paints, glitter glue and stickers
  • You can either keep them as they are or stack a shorter tree on a taller one as we have done to make them look more ‘tree like’
  • Then either keep as a snowy scene as we’ve done, or pop a little hole in the top with a pencil and add ribbon to make them into ornaments for your Christmas tree.
  • Enjoy!

Natural ice lollies for babies with Nuby Fruitsicles

Nuby Garden Fresh

Nuby’s new Garden Fresh range gets a big thumbs up for promoting home cooking, designed for less waste so that home prepared food can be stored and frozen it prides itself on supporting Mummy Made Goodness.

We try to avoid processed foods where possible and I’ve always made home cooked meals for Joss so this range has big appeal taking you from preparing and storing through to serving up foods for your little one. New products like the Fruitsicles for making fresh ice lollies at home join old favourites like the Nibbler and weaning spoons, the range is really versatile and comes in lovely bright appealing colours for kids.

We often meet with friends we met through the baby led weaning group I co-run, we get together once a month or so to share food with our little ones, we sometimes get joined by new mums who are interested in baby led weaning and share recipes and ideas for home cooking that the whole family can enjoy (it’s where the idea for these potato pancakes came from, saving leftovers to make something totally different!).

Natural ice lollies for babies

As we’ve been having a spell of good weather I prepped a big batch of Fruitsicles for our meeting last week, as well as our famous fruity pack a punch toddler flapjacks! In keeping with the all natural theme we had bowls of blueberries and raspberries, yogurt smoothies and homemade houmous, yum!

The fruitsicles I prepared were jam-packed with fresh strawberries and two oranges that I had whizzed up in my blender, I kept it to a fairly thick pulpy consistency and then popped spoons of the mixture into the moulds. Each Fruitsicle is filled with two teaspoons of pureed fruit and so they’re great for portion control for babies and toddlers, and the soft grip handles are perfect for little hands.

fruitsicles

We met in the park and started with the Fruitsicles before they melted, they were a big hit, I had one too (for taste test purposes of course!) and these all natural ice lollies were really fruity and naturally sweet! I later made up a batch using some of the leftover yogurt smoothies but they were so popular they were gone before I could get the camera out (natural yogurt, banana and raspberry if you’re wondering how they were made!)

fruitsicles 2

Giveaway time!

Nuby have kindly given me a bundle of Garden Fresh products to give away including:

  • Fruitsicles

  • Nibbler

  • Suction Bowls

  • Coverall Bib

  • Grip N Sip Cup

win a nuby weaning bundle

If you’d like to get your hands on this huge bundle of goodies simply enter via the Rafflecopter widget and leave a comment on this post

WINNER ANNOUNCEMENT – WELL DONE EMMA!

T&Cs – UK entries only, there is no cash alternative, winner will be chosen at random via Rafflecopter and informed within 24 hours of competition close

Toddler pinwheels for picky eaters

Real Life

I’ve been re-blogging this post about how to handle not being able to breastfeed for World Breastfeeding Week 2014 which comes to an end this weekend.

Joss has been a bit off colour lately and consequently has eaten very little. My toddler pinwheels for picky eaters are great for lunches and Joss usually plays with them, then eats a bit. If she is involved in making them and sprinkling the cheese then even better, she’ll be more interested in eating them as she had a hand in making them!

toddler pinwheel fussy eaters

Ingredients

Sheet puff pastry
Grated cheddar
Ham
Tomato puree or two tablespoons of passatta

I cut my puff pastry sheet in two and freeze half, the other half makes eight pinwheels. Unroll the pastry and spread the tomato onto the base, then top with slices of ham and then with grated cheese, my trusty cheese sprinkler Joss likes this bit!

Don’t overfill as the next stage is to roooool the sheet of pastry like a swiss roll, then slice into eight chunks, lay each out on a greaseproof papered baking sheet.

Bake at 180 degrees for 10 to 15 minutes then cool and serve, or store for the next day or two for packed lunches.

Blog life

I had tea with Beth from Betty and the Bumps and Hannah from Mums Days yesterday and they got me thinking about where my blog is going. I have a new list of questions and some things I am working on, like my blog traffic. In the short term I have posts coming up on handling toddler fears and a competition coming up too.

Inspiration

I have been reading some inspiring ideas on writing as posted by Beautiful Misbehaviour and giving some thought to a challenging post I’d like to draft

– See more at: http://mumsdays.com/#sthash.KOYZpbwP.dpuf

My salt scrub recipe for smooth pins!

Hello sunshine, time to get my skin tip top with my salt scrub recipe!

lavender rosemary scrub

Measure out your wet and dry ingredients depending on the size of your storage pot which should have a nice well fitting lid, I use an empty Lush pot but a clean jam jar would do. To measure pour your salt into the pot you’ll be storing in and leave a centimetre gap at the top for your oils, use roughly five tablespoons of olive or almond oil for every half cup of salt. To prepare the fresh rosemary and lavender I simply snip the dried flowers and fresh stems with scissors, I used five drops of lavender oil for a 50ml pot.

Mix everything together well and pop into your pot, and away to the shower you go!

lavender rosemary scrub in pot

I make a similar scrub in a gorgeous pink here

scrub