Upcycling From Adult to Toddler Apron

Joss loves to help out in the kitchen and I looked for a little apron but didn’t like all the plastic ones we saw. Eventually I spotted an adult apron in Poundland and liked the sweet ditsy flowers so this was a cut and stitch job waiting to happen! Upcycling From adult to toddler size is easy, if you want to do the same just chop off the bottom and either use to make a pocket or save for a hairband or other project.

Then chop the sides saving the ties (I used a dress of hers for basic measurements for length and width) then I cut off the neck tie and repositioned a couple of inches closer together and stitched up all the hems finally repositioning the waist ties after she tried it on to give a comfy fit.

Cute and thrifty in less than an hour!
fabric toddler apron

Taking Baby for their First Haircut and Other Adventures

Real life

What a change in the weather, back to grey skies and rain but it’s been a lovely week nevertheless. Last weekend started with a child-free day to myself, a rare treat and time for a haircut and spot of shopping. The weekend saw the arrival of mr sunshine and the building of a garden bench, then we had a lovely Tuesday seeing Hannah and Reuben from Mumsdays in the morning and a first haircut for Jossy too.

OLYMPUS DIGITAL CAMERA

At the Hancock

I was delighted to be handed her first curl for our tots memory book, it completes her book and though I feel sad that we’re drawing a close on the ‘baby’ months this little girl is a joy to be around!

OLYMPUS DIGITAL CAMERA

The hairdresser was brilliant with Joss, I recommend going somewhere you go yourself, I love our stylists at my local salon, friendly and bubbly they really put Joss at ease, they asked her about her day and talked to her like she was a grown up which she loves, then when she was relaxed she had a quick trim to get her used to the experience, there were no tears, no need for distractions and a lot of smiles!

Blog life

In blogland I had a really popular post on making a summer garland this week, if you’d like to make one yourself details are here!

OLYMPUS DIGITAL CAMERA

Inspiration

I also lost a few hours this week on a bit of a bloggy jaunt which started with this beautiful book, following some of the blogs it mentions somehow led me to find the blog Junkaholique for which I am very grateful, what a treasure-trove of inspiration and loveliness!

homemade

- See more at: http://www.mumsdays.com/#sthash.mTNrKCA9.dpuf

Toddler Stained Glass Windows

OLYMPUS DIGITAL CAMERA

This was a great idea that our local museum sparked off, toddler stained glass made from acetate, glue and lots of little pieces of torn up tissue paper.

Help your tot to spread pva glue all over one side of the acetate, then pop different coloured pieces of tissue paper over the glue, it’s fine to layer them up, you just don’t want it to be too thick to see the light through!

Leave to dry, then fold a piece of card in two and cut out a heart shape to overlay on the clean side of the acetate. Stick in place on the card and leave to dry, then hang in a window to let the light through!

For older kids you can chat about how glass is made and look at pictures of more intricate stained glass as we did at our art class.

Here’s one to get you started, I think this one is a good one to chat about!

Cake Angels Ice Cream Cone Cupcake Review

Goodies

The lovely folk at Cake Angels sent us an exciting parcel this week, look at all those sprinkles, a cake lovers dream! Ice cream cone cupcake anyone? I was intrigued!

OLYMPUS DIGITAL CAMERA

How to

These cupcakes were so simple to make, just add water to the mix, fill the ice cream cones, and bake for 20 minutes. When they came out we let them cool, topped them with butter icing using the icing sugar from the pack, and then the fun part, decorations!

Sprinkles everywhere and a sticky child who really loved the vibrant colours! A stroke of luck that we had icecream themed cups from Polarn O Pyret’s party pack!

OLYMPUS DIGITAL CAMERA

The proof is in the tasting of course, the cakes were light and airy and the chocolate flavour came through well, Joss loves icecream cones so that they stayed crispy was a big plus for her, and they were so simple for us to make together that I’d definately pick up another pack for a fun afternoon together!

What do you think?

Good enough to eat?

OLYMPUS DIGITAL CAMERA OLYMPUS DIGITAL CAMERA

WP_005443

Thanks Cake Angels, we really enjoyed our treat!

Disclaimer: I received these goodies for the purposes of review, all views are my own.

Button Craft Tutorial Mumslist

Real Life

This week has been more relaxed but relaxing myself if something I find hard so I took to crafting again as I like to have busy hands to keep a busy mind calm! We’ve also been potty training but more on that later!

index

You can make this little button heart in less than half an hour with some fine craft wire and an assortment of buttons. Just thread your buttons onto the wire one after the other gently bending the wire to get the buttons to sit close to each other, then when you have a long line of say eighteen buttons bend the ends of the wire together to form a circle, then bend into a heart shape and keep moulding the wires til you’re happy with it. add a ribbon and admire your handiwork. This works really well with little crystal buttons or a mix of crystal and silver too!

heart

Blog Life

This week I have been joining in with some comment linky groups and have come across some lovely new (to me) blogs in doing so. I have also been working on my photography, still not great but I thought I’d share some of the things I’ve been trying here with my five photo tips for fellow non artistic bloggers!

Inspiration

I came across Keri-Ann’s blog through a blog comment linky Gingerlillytea is pure whimsy and gorgeousness you must stop by with a cuppa and have a good old read!

I am also hugely inspired by this pin and am looking at creating something similar in our little space!

c97e802db6ddd6a0e54116cabc3de6d1

- See more at: http://www.mumsdays.com/#sthash.afvKx888.dpuf
 

Very Berry Pavlova

A simple very berry pavlova jam packed with frozen raspberries and blackberries, thrifty but with no compromise on taste!

pavlova1

Ingredients

3 large egg whites
175g golden caster sugar
Large tub whipped cream
100g of mixed frozen blackberries and raspberries defrosted
One teaspoon golden caster sugar

Preheat the oven to 150 degrees

For your meringue, place your egg whites in a large bowl and whisk until they form stiff peaks, you need to be able to turn the bowl upside down without the egg whites tipping out! Once at this stage stop whisking the egg whites will collapse

Whisk in the 175g sugar a tablespoon at a time, whisking until all the sugar is in.

Prepare a baking sheet with baking paper, spoon a third of the meringue mix on to the baking sheet and smooth out with a spoon to form a 6 inch circle

Take a large tablespoon of the remaining meringue mix and dollop next to the large circle spooning six smaller around the larger circle, this will form a ‘nest’ for the filling.

Put the baking sheet in the oven turning the heat down to 140 degrees and bake for an hour, then turn off the oven and leave the meringue in to cool and dry out.

Top with whipped cream with the berries gently swirled through, you can decorate with chocolate if desired.

pavlova

Tasty Tuesdays on HonestMum.com

Deckchair Stripe Lavender bags

I made some of these little lavender bags as a gift for my Mam; I’d booked a massage for her birthday and wanted her to have something relaxing to unwrap as I don’t like giving a gift token as a gift with nothing else, must be related to my wrapping paper obsession!

These are really easy to make up, if you have your own lavender plant as I do harvest the heads as they are drying at the end of their season, bundle and hang them together and then when they’re dry take the husks and store them in a dry place until you’re ready to use them. Stitch together two scraps of complementary fabrics insides facing, I liked a summery deckchair stripe, leaving a small gap to turn the right way round through, then fill with lavender and hand stitch the gap closed.

index1

So satisfying seeing something from your own garden brought back to life!

index

DIY body scrub…very very bright pink!

I adapted a Martha tutorial to make this bright pink scrub today, all for under £3 (I had some ingredients at home but still waaaay cheaper than a shop bought spa version!)

Image

I used two cups of epsom salt, 100ml of almond oil, five drops of lavender and chamomile blended oil and mix mix mixed with a small amount of natural red food colouring to give the satisfyingly pink colour. These photos are taken half way through, once topped with the second cup of epsom and a little more almond oil it mellowed to a lovely rosy pink! A real softening treat on a budget!

Image

Washi tape ideas 101 – Summer Garden Lanterns Tutorial

We’ve been working on our back yard for a while now and decided to buy a wooden bench so that we can sit out and enjoy the summer evenings.

As well as making some robust cushions I’ve been working on some little garden lanterns made from jam jars, to light the way on summer nights. I’ve posted a lot of washi tape ideas lately but this is my fave!

8

Want to make your own?

You’ll need:

A clean sticker free jam jar

Some fine wire

Washi tapes

Scissors

(Optional beads)

A tealight

Start with your jam jar

1

Add washi tape in rows or stripes, you can leave a gap for the night to shine through or cover the whole jar, whatever takes your fancy

2

I’ve done stripes

3

Take your wire and cut roughly half a metre, folding in half

4

Wrap the wire twice around the jar and twist at the side, then create your handle, tuck the handle wire under the wire wrapped around the jar to secure in place and twist firmly to make a sturdy handle (I added beads but you don’t have to, just be careful to make a long enough handle so it doesn’t get really hot!

5

Slip a lit tea light in there (carefully!) and enjoy!

6

Never to young for a rainy day craft box!

At school I loved a rainy playtime, stuff came out of the cupboard that you only got to see on a rainy day, the novelty factor was high!

I started a craft box for those days when Joss and I needed a distraction.

OLYMPUS DIGITAL CAMERA

It’s something new and different from the usual or for grouchy days where something she hasn’t seen for a while takes her interest and calms her. Teething days can be especially tough as she seemingly goes from one dangerous activity to another because she feels frustrated! On days like that I find it hard to concentrate so I have stuck a list in the box lid with ideas for messy play:

OLYMPUS DIGITAL CAMERA

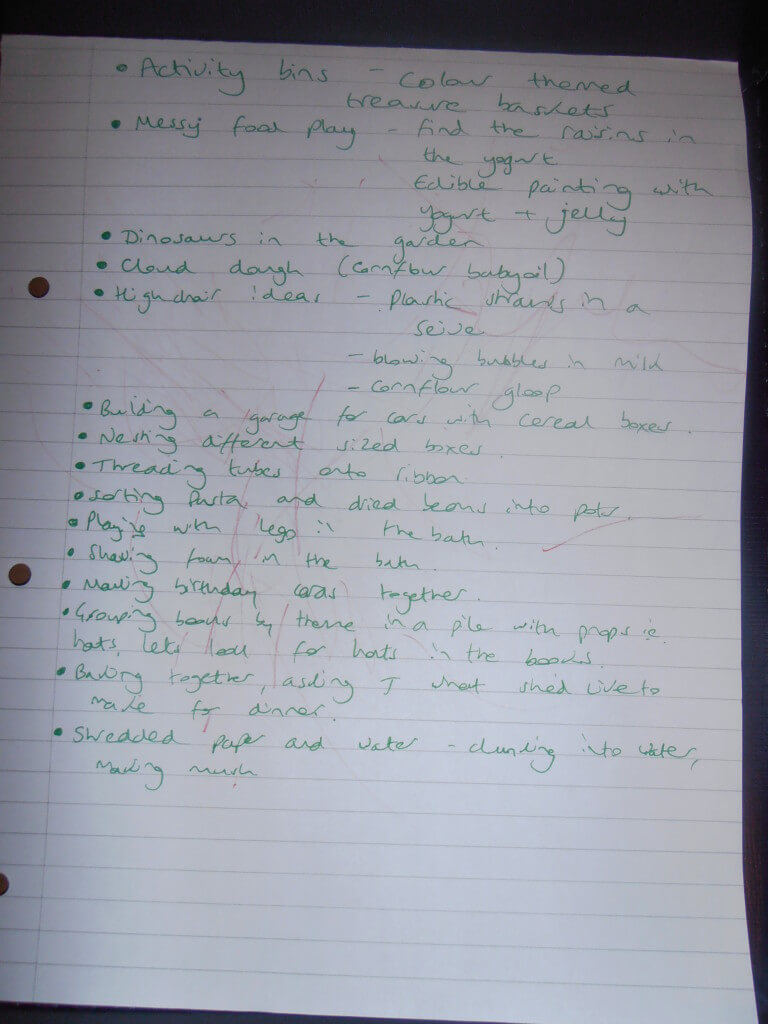
It includes the ingredients for playdough and mentally prompts me to remember something I read a while back, that children are the opposite of gremlins and find water calming so if she starts to get a bit ‘gremliny’ there are some bath activities on there too!

how-to-really-love-a-child

Anyway, what’s in the box?

OLYMPUS DIGITAL CAMERA

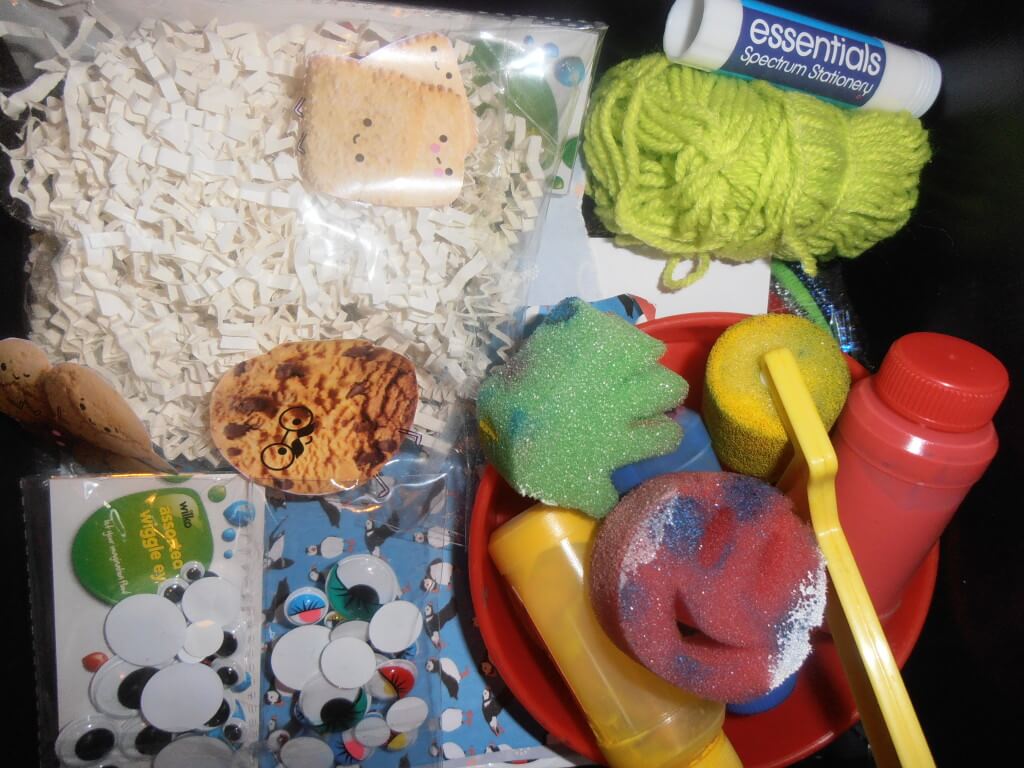
I buy the contents from charity shops, discount stores and supermarkets, if you’d like to stock your own here’s our rundown of the things we like:

Felt pens, pencils and crayons
Pipe cleaners
Pom poms
Tongs and small pots for picking up pom poms and sorting
Googly eyes
Nice pieces of scrap papers
Blank card
Glitter
Shredded paper
Sponges and paint rollers
Paint
Stickers

And what we currently have:
OLYMPUS DIGITAL CAMERA

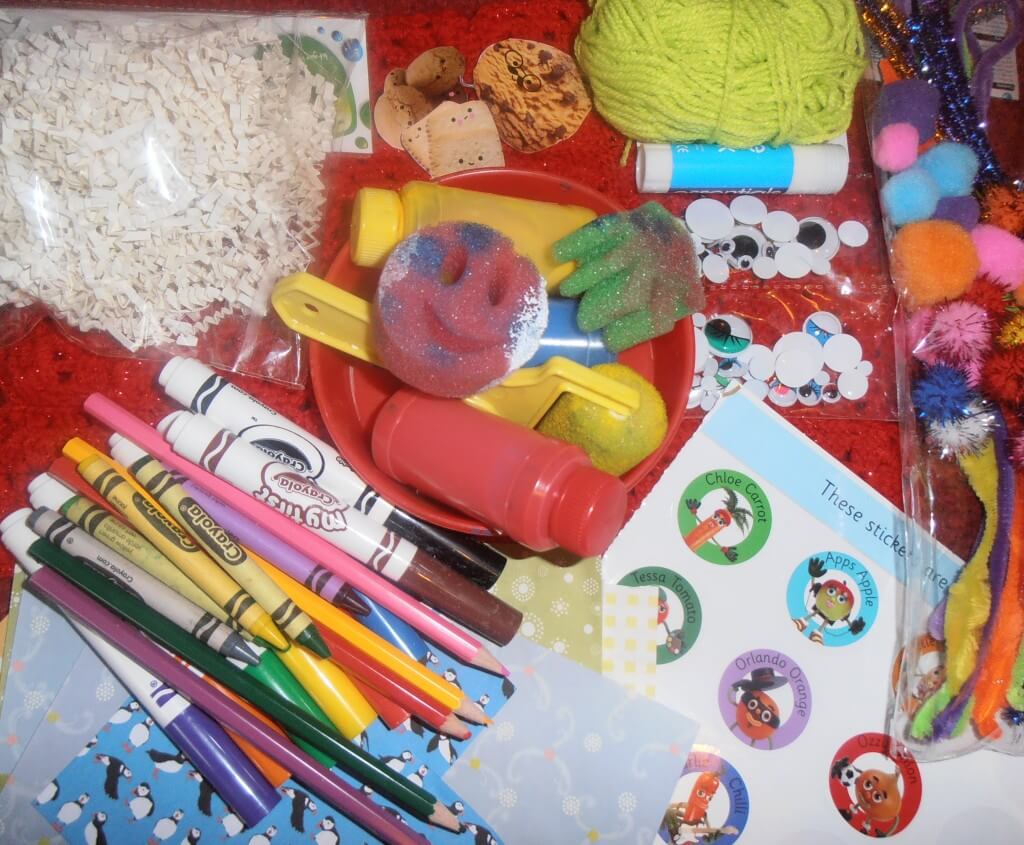
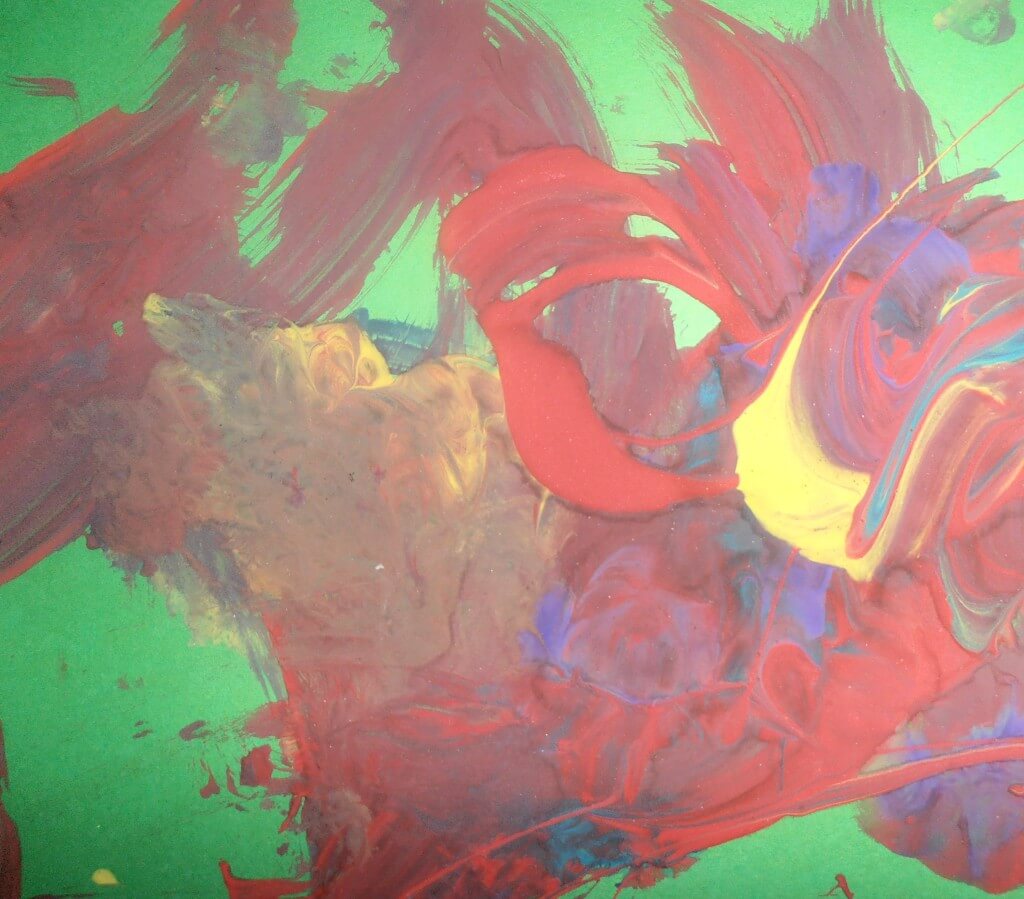
We’ve been doing a lot of painting recently
OLYMPUS DIGITAL CAMERA

But we’ve also been exploring, mainly pom poms and pipe cleaners at the moment, pipecleaners pushed in the holes of a colander are a big favourite, as is picking up and sorting pom poms with tongs!

What’s in your rainy/grouchy day activity box?