Why I support #natstatweek #writingmatters each year

I have a confession to make, I have terrible handwriting, always have, and probably always will.

But writing still matters to me. I think ideas flow more naturally on paper and I like to map out thoughts, linking ideas and colour coding, it’s something the researcher in me loves about working on a big blank sheet of paper!

This year National Stationery Week is running from 25th April to the 1st May, and it’s my third year supporting as a #natstatweek blogger.

I love to get involved as it takes me back to the beginning of every school year, the promise that came from a new pencil case, new colouring pens, and later even the boring stuff, the maths sets and protractors; I always have and always will love shopping for stationery, I know it doesn’t set everyone’s world on fire but I find it utterly joyful!

Over the coming weeks I’ll be reviewing a selection of products from Staedtler and Scheaffer to Maped and NuCo, here’s a sneak peak of what’s to come, and I’d love to hear about your must have products too!

Untitled

DIY Christmas Cones

I love a Christmas project, and this year I’ve been making a few new decorations for the tree for J to enjoy. When Crafters Companion dropped me a line to ask if I’d like to try some of the Debbie Shore patterns from her Christmas Projects DVD my first thought was that I haven’t used my machine in ages, but my mind was put at rest when I saw that the patterns were simple, clear and had fewer than 5 steps!

These Christmas cones are just one of many great projects on the DVD and now that I have been bitten by the sewing bug again I’m going to start another project tonight! The cones required me to cut two pieces of fabric that had been folded in half, sewing an inner and an outer cone together to form a lining for the cone, adding ribbons and buttons to finish off, the projects really are as simple as that and because the DVD comes with a sizeable piece of fabric it makes for a really great kit for a novice like me!

Debbie really nicely captured my imagination and I’m now industriously crafting more decs:

“I still remember the Christmas decorations from my childhood, that were brought out every year, bringing a smile to everyone’s face and making the festive season that little bit more special. I’m hoping the characters on this CD will do the same for your family, with the likes of Rodney Reindeer, Christmas Carole, Paul the Penguin and of course, Santa, making an appearance each year.” (Debbie Shore)

cones 1

Filled with a few stocking filler sized presents these make a lovely gift in themselves, here’s one I’ve put together for my Playmobil fan!

christmas cones

Do you have any Christmas projects on the go? I’d love to hear about them!

Using mini baubles to decorate an advent house

using mini baubles 1

It’s Christmas craft time again, the nights are drawing in and I’ve been getting busy with a few activities to relax and unwind. This week I’ve been taking part in a blogger’s challenge set by Ocean Finance to decorate a plain wooden advent house. I’ve been thinking about a little advent tradition for the last few years but didn’t ever get round to doing something about it! I was sent the house and a voucher to decorate it; at first I was a bit daunted, I painted the house a chalky white using a Rustoleum sample, and then felt at a bit of a loss as to what to do next!

I finally had the bright idea of using mini baubles to fill the roof space, when I saw these gorgeous pastel colours I knew I’d set on the perfect colour scheme for J! I got to work with my gluegun, attaching the sequin trim and securing the baubles in place, it was a bit tricky to get them organised into the tight space but a bit of jiggery pokery seems to have done the trick!

This little house was finished off with some really glittery stickers to draw the bauble scheme together, and I added number stickers to each door. I picked up a bargain bucket of playmobil bits and bobs to fill the doors, and of course some chocs too, roll on December 1st, I think my little poppet will love her advent house!

using mini baubles

I’m now off to check out pinterest for ideas for using mini baubles to make other decorations as they’re so sweet I bought two boxes!

Cooking with kids: Rusty’s Winter Warmer Granola

Enlist the help of your toddler to make a healthy, tasty and pure Granola that’ll give you something guilt-free to look forward to every morning.

rusty's granola

Ingredients:

I use about 100 grams each of the below nuts / seeds:-

Linseed – great plant source of omega 3 fats, adds a nice crunchy texture to the granola

Walnuts – omega 3 fats, can reduce risk of cardiovascular disease, source of antioxidants, good for your brain

Pecans – Great source of vitamin E which is important for healthy skin

Brazil nuts – rich in mono-unsaturated fats, vitamin E

Almonds – good source of magnesium which is good for a healthy heart, potassium, vitamin E

Sunflower seeds – lots of Magnesium, vitamin E, Selenium (may be good for preventing cancers)

Pumpkin seeds – contain Zinc which is great for your immune system, mood, sleep, skin (and more)

Dried, diced papaya and / or pineapple – taste great

One large cooking apple – for binding the granola

Honey – so good for you in so many ways I can’t list them all here and anyway you need it to bind the granola together

Oats – I use quick cook oats as they’re easier to buy in a supermarket but simple rolled oats are a longer lasting energy source

How to

Slice up the large cooking apple into chunks and put in a pan with three or four tablespoons cold water. Put a lid on and give it 5-10 minutes at a low – medium heat. Have a look and give it a mix. Once it’s the texture of apple sauce take it off the heat and put it to one side while you prepare the rest of the granola.

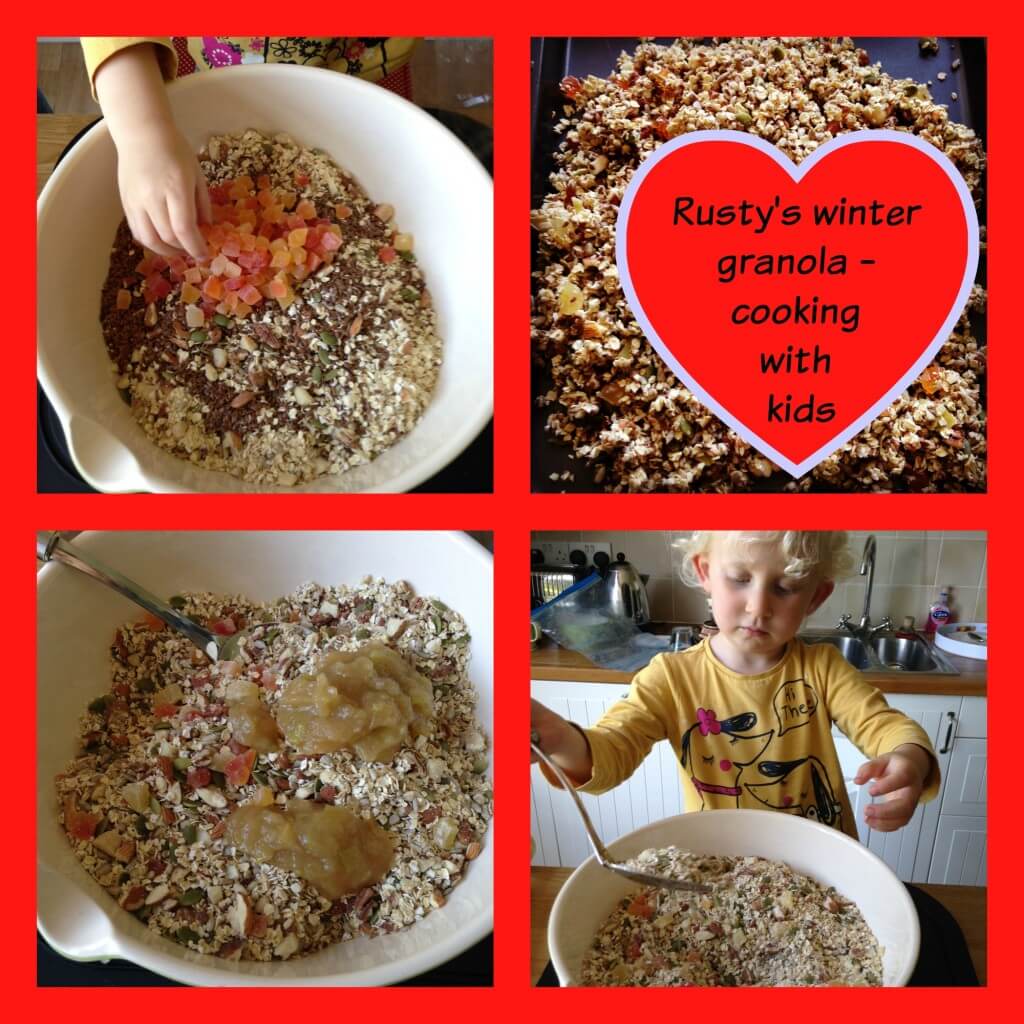
This is where your toddler will love helping. Show her all the nuts you’ve bought for your granola and tell her what they are, what’s good for her about them and encourage her to have a taste (being mindful about allergies and choking – you know your own kids). She won’t like all of them but will hopefully like some. Eating nuts is a great habit to get children into – they’re great for snacking and keep really well. Very healthy in moderation.

Now help your toddler to pour all of the nuts into a big, strong freezer bag. Seal up the bag (be sure to squeeze the air out first) and get a rolling pin. On a large chopping board or tough surface, help your toddler to smash the nuts up with the rolling pin. Keep her fingers out of the way and be sure to make some serious noise. I personally like to make monkey noises as loudly as possible with Joss. It’s a fun way to let off some steam and smile. If the noise is too much for you or someone else at home, you could provide some monkey ear muffs for the duration. I try not to worry about the size of the nut fragments, it’s nice to have a bit of a mixture for texture and crunch.

Get a big mixing bowl and pour in 500 grams oats, the smashed up nuts, seeds and dried papaya / pineapple. Ask your toddler to give it a quick mix to make sure the nuts and seeds are evenly distributed.

rusty's granola 3

Now take the pan of cooked apple from earlier which should still be warm. Help your toddler to add 2 – 4 tablespoons of honey and mix in. You can use whatever honey you like but I really like using an orange blossom honey for the citrus taste. I add a couple of teaspoons of ground cinnamon too and then ask Joss to mix it up really well, trying to make sure the cinnamon is well combined, get your toddler to have a smell, amazing!

rusty's granola 1

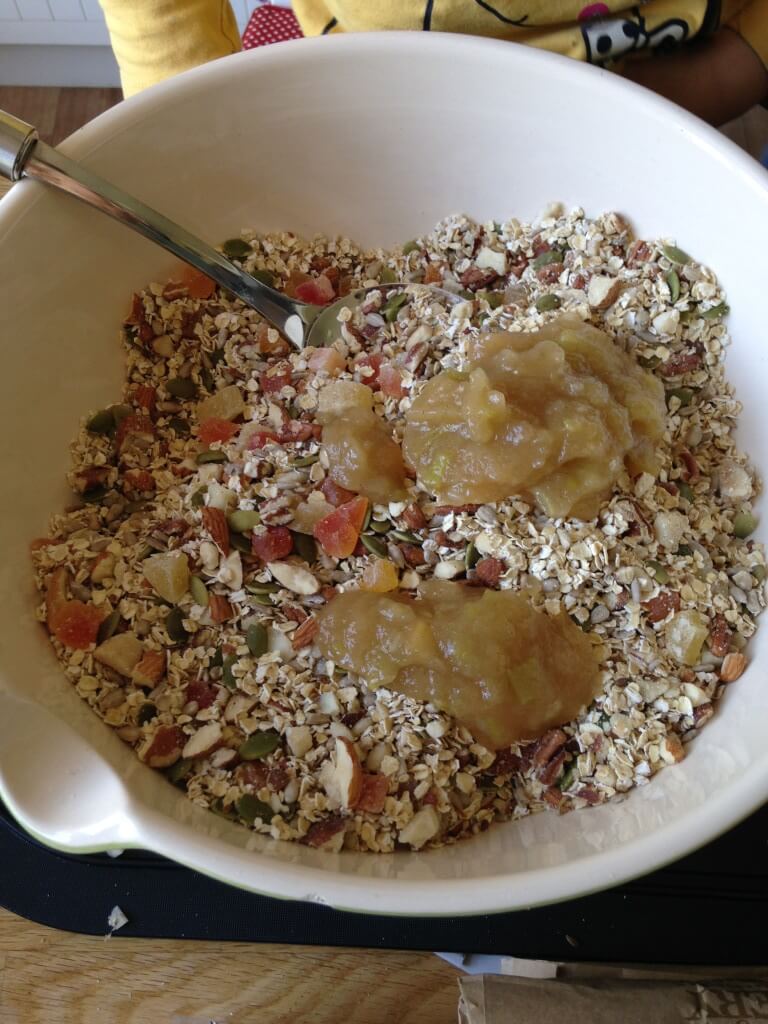
Ask your toddler to spoon about half of the apple / honey / cinnamon mixture into the bowl of oats, nuts, seeds and fruit and mix it in well with a big spoon. Once she has combined as much as possible, add the rest of the apple sauce mix too and ask her to give that a good stir in. You might need to help out to ensure that everything is well mixed in. The whole mixture should end up quite stodgy and moist. If it doesn’t fit this description you can always add another tablespoon or two of honey to help it stick together.

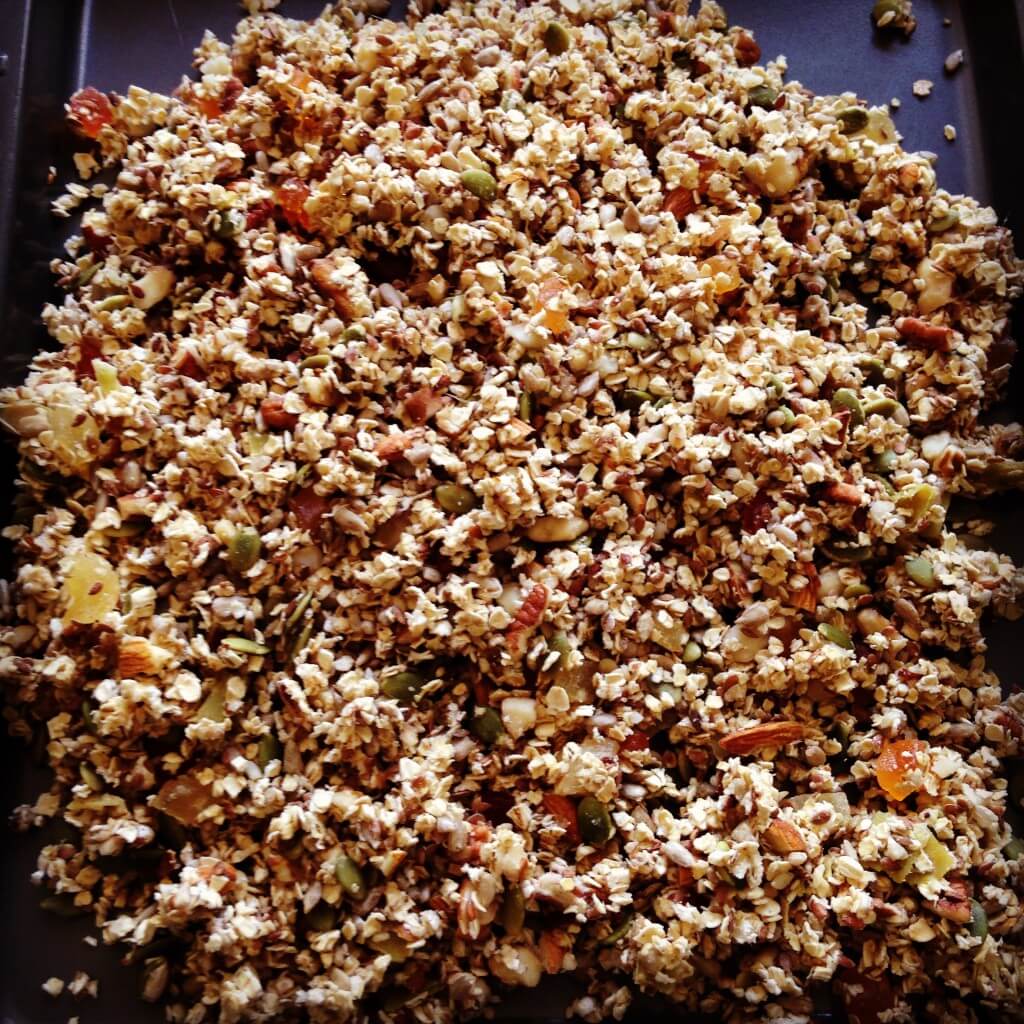
Preheat your oven to around 140 – 160 celsius and spread the mixture out thinly onto baking trays. The last time we made it, the mixture covered 6 baking trays so we had to cook it in three goes. Put each round of baking trays into the oven for around 10 – 15 minutes, checking regularly and redistributing on the tray if necessary. A little browned is ok, but take care not to burn it. Once done, leave out for a few minutes to cool down and fully dry out. Break up gently and store in an airtight container.

rusty's granola 2

I eat Rusty’s granola with either coconut milk or natural yogurt and a little honey. You could try adding fresh fruit to it as well. This granola lasts me a month; don’t overdo it – there are a lot of nuts and seeds in this granola so probably 3 or 4 tablespoons is enough for breakfast. What a great treat on those autumn / winter mornings!

Optional: I sometimes add finely chopped, crystallised ginger before baking. Use in moderation but it’s a brilliant winter warmer!

A jar of Seaham Seaglass

This summer Joss and I have visited the beach every week, exploring the Northumberland and Tyne and Wear coastlines and we’ve loved it!

When Think Money challenged us to fill a jam jar with our holiday memories for their Jam j-art project I had an idea that it would have a beachy theme, little did I know the treasure that would eventually come to fill our lovely kilner jar as we start to get ready for preschool!

jar

Our seaside visits took us to Seaham Beach, famed for its treasures – seaglass! Seaham seaglass is pretty special stuff. until almost a century ago there was a glassworks at Seaham and waste glass from the hand blown bottles was tipped into the sea, years on and polished by the sea these marine treasures can be found by keen eyed beachcombers. End of day glass is especially prized, tipped into the sea at the end of the day these pieces are multicoloured and so pretty!

sea glass

On our first trip we found a few small pieces which I blogged about at the time, and by the end of the summer we’d become a little bit addicted to the hunt and ended up with some beauties!

These are my favourites:

seaglass montage

Displayed in our kilner jar they’re a reminder of a summer of adventure, and as I’ve lightly oiled some of the more dense pieces to give a gorgeous glow keeping them under a lid keeps them dust free and vibrant!

seaglass 3

A ProjectLife tag with the date tied with some lovely ribbon from a dollypeg makes this a great memento!

kilner jar

Disclaimer: Think Money provided me with the Kilner jar and a contribution towards project materials, all words and photographs are my own

Crafter’s Companion Easter Wreath Make

The challenge

The lovely folks at Crafter’s Companion set me a little Easter challenge, to make an Easter wreath using some goodies they sent me in the post. I love a craft challenge, and haven’t done anything creative for a few weeks so I took up the mantle, and here are the results!

IMG_4497

Supplies

  • A cut out cardboard ring (I made my own by drawing around two different sized plates and cutting out carefully with scissors
  • Two different coloured ribbons (I used a spring green and cream)
  • Collal tacky glue and Collal all purpose glue
  • Crafter’s Companion Centura pearl card pack
  • Patterned paper flowers
  • Buttons

index

Easter Wreath Make: How to

  1. Secure your ribbon to the back of the wreath with a little all purpose glue, then wind the ribbon around until you’ve covered just more than half of the wreath. Switch to your second colour ribbon until the wreath is completely ribbon-wrapped.
  2. Add another length of ribbon using all purpose glue to make a loop to hang your wreath
  3. Cut out your flowers from patterned paper (I used a printable) and cut out some rough leaf shapes from pearl card stock. Assemble your flowers in layers with tacky glue and pop a button in the centre of some of them to add to the 3d effect, stick the leaves to the back of each flower
  4. Assemble your wreath by gluing the flowers into position slightly off to one side of the lower wreath
  5. Cut some ribbon shapes from pearl card and assemble with tacky glue. I cut a large ribbon shape, a smaller copy in a contrasting colour, then assembled a simple 3d bow by gently folding the card stock to make the ribbon ‘stand out’ – a final loop of card to cover the centres of the ribbons finished off the look – again I used tacky glue to affix to the wreath

The finished piece!

I have hung my Easter wreath onto a piece of willow branch, with some contrasting coloured paper eggs to add to the festive feel! I’m really happy with the finished result – thanks Crafters Companion for providing me with the materials and the inspiration for this eggstra special make (no more Easter puns now, I promise!!)

IMG_4504 IMG_4516

Sheaffer Sagaris Metallic Fountain Pen Review

This beauty was a total treat from the folks behind National Stationery Week – I love to write with a proper pen, there’s something really nice about the weight and the ritual of writing with fountain ink! I remember my first Sheaffer fountain pen, it was given to me by my Aunt and I used it all the way through my GCSEs and A Levels, it became my lucky pen until I moved onto university and switched to their rollerball pens.

IMG_4236

In gorgeous metallic blue this is a serious writing implement! Presented in a hard case presentation box complete with cartridges but also the option of filling from an ink pot this would make a lovely gift, it certainly blew me away to receive it as a review item!

I think writing with a proper pen improves my handwriting and makes me take my time about writing too, that’s important in journalling and planning as those tasks require a bit of thought and extra attention.

Do you have a ‘lucky’ piece of stationery – I’m hoping this one will serve me well as I am about to start a new job!

NSWbloglogo2

Kokuyo Staple-Free Stapler

I am delighted to be a National Stationery Week blogger, as a recent student and self confessed stationery-phile I love to try new products to the market. Kokuyo ’s staple free stapler is a revolution in stapling, it has no staplers but holds papers securely, magic!

Kokuyo Staple-Free Stapler

This little beauty makes two incisions in your paper, folds them back, then ‘staples’ the paper together using a special punch action – how handy is that!

I deliver a lot of training courses and frequently staple the materials for handouts on the train, this negates the need to take lots of additional stationery with me and can staple up to four sheets of paper at a time making it perfect for those powerpoint presentations and evaluation forms! As you guys know I also love anything that reduces waste so this is a pretty eco friendly option for smaller stapling jobs too.

I was sent the Kokuyo staple free stapler in green and couldn’t wait to give it a go, as well as securing my work it made light work of attaching some paper bunting I made for a blog background and the little arrow design is pretty unobtrusive for craft projects too!

IMG_4233

I may have also had a few other bits make their way into my stash this week, Project Life cards, new washi tapes and an eBay accident in which I thought I bought a single Totoro bookmark but 52 arrived instead!

stash1

What do you think? Will you be trying the staple-less stapler?!

NSWbloglogo2

The Weekend Box Club and Try It Free code!

Fancy something crafty for the weekend? We’ve been reviewing The Weekend Box club this week!

The lowdown on the Weekend Box Club

collage

In November (2014) Weekend Box won ‘Start-Up of the Year’ at the Start-Up Loan Competition in London, the Weekend Box activity packs are designed to fit through your letter box fortnightly and contain four activities to keep little ones aged 3 – 8 busy over the weekend.

1970479_723301621055477_162958948_n

Each box has something foodie, something to upcycle, something to make and something sensory too. Sectioned into handy activity packs with a ‘how to card’ and stickers and certificate on completion the pack is so handy for getting some quick and engaging play off the ground!

collage2

I love that the packs are designed to encourage discussion of healthy eating, recycling/green living and something sensory too, it’s a really well rounded selection!

Each box has:
Something to Cook
Something to Make
Something to Explore
and Something Green

The Theme

The theme of our box was The Aztecs, although Joss is still a little too young to get the deal behind the theme we looked at some cool Aztec prints online in preparation for getting started! When the box arrived I was really impressed with the thought put into the design, how exciting for little ones to receive their own post in a beautifully printed box full of things to make and do.

The Activities

We had a whale of a time with our four activities. We made hot chocolate together and this was a bit of a special moment as J had her first ever hot chocolate and boy did that go down well! We talked about how it was a treat and the spice mix included in the pack smelled so good that it was a sensory activity in itself!

The crafty bits were brilliant, we loved making an Aztec parrot and as J has just learned to get to grips with little scissors making a coaster from foam was fun and resulted in a sweet little gift for daddy to take to work too! Although not the mosaic design that the pack suggested this demonstrates that the materials included can let kids do their own thing too! Finally we both enjoyed making the Aztec prints from string and this is something we’ll definitely do again to make wrapping paper on a larger scale!

What we think

I think this is a brilliant idea and perfect for a rainy weekend or to dip into on a slower day, I’ve just recommended it to a friend who is stuck at home with a tot with chicken pox too! The age range, 3 -8 shouldn’t put anyone with a younger toddler or older one off as the activities are really engaging at both ends of the spectrum (my little lady is almost 3). J and I were delighted with the contents, I loved the powder paint, ingenious stuff, and the resulting makes are brilliant and now taking pride of place in our craft gallery!

Try it for Free!

The lovely people at the Weekend Box Club have given me a promo code for you guys to get your first Weekend Box for free. Boxes can be redeemed from www.weekendboxclub.com with the code ANG236 (new customers only please and just one free box is allowed per household) – I’d love you to share your makes with us!

Washi tape beach huts

washi tape beach hut

This one does what it says on the tin, it’s a swift tutorial using washi tape, I know it’s winter but I’ve made a stack of these using different tapes and am going to string them onto bunting for in J’s bedroom, there’s something really jolly about stripy beach huts, whether using traditional blue and white tapes or something a bit jazzy like this one!

How to make washi tape beach huts

Make yourself a beach hut template (essentially a rectangle with a triangle on top!) and draw around it onto plain card.

Use your tapes to fill out the design, hoops work well but any design would work really! You can overlap the tape and be quite rough with it as long as you cover the hut shape.

Finish the hut by using a wide tape in a contrasting colour to make the ‘roof’

Decorate as you wish, I used wide blue tapes to make a door and windows and decorated with a sharpie, a button and some washi curtains and a gold ‘rope’ effect embellishment.

Cut out your beach hut and use as a card topper, as bunting or a jolly postcard!