Chinese New Year Toddler Paper Fish Kite

chinese new year toddler kite

Newcastle’s Chinatown lies in the historic heart of Newcastle in Grainger Town and we use the Chinese supermarket down there a couple of times a month. I’ve always loved Chinese New Year, the street parade and fire crackers, and last year J visited with her Daddy and loved it too, coming home with fortune cookies and a paper dragon and a big smile on her face.

This year we’ve made some lanterns but I’ve seen lots of tutorials about those, we decided to make a paper kite this week and I’ve shared some step by step instructions below, with lots of room for artistic license. For J this activity was about a new skill, paper scrunching and sticking, so she made the scrunched paper cuff whilst I assembled the main body of the fish.

chinese new year toddler kite 2

Chinese New Year Toddler Paper Fish Kite – step by step

You need:

An empty toilet roll

Three sheets of tissue paper in different colours

Plain white paper

Glue

String/thread

Scissors

How to (tots)

Set them away with a sheet of paper and scraps of tissue paper and show them how to scrunch and stick the tissue down to make a cuff to decorate the fish. Adding glitter is always popular with toddlers! When finished attach the cuff to the fish with tape

How to (grown ups/older children):

Take a large sheet of tissue paper and place the toilet roll inner at the top left of the sheet, then roll the inner to cover it in tissue paper, secure with glue or tape, this forms the mouth of the fish, at the other end make a tail by cutting a deep v.

Decorate the body of the fish by wrapping with strips of different coloured tissue paper and tape/glue in place.

Cut fins from tissue and attach them to your fish

Cut and attach circle shapes for the eyes

Cut long strips of tissue to form the tail pieces and attach inside the tail with glue

Finish by carefully punching two holes in the top of the fish (in the toilet roll inner) to attach a string to ‘fly’ your kite!


Displaying beachcomber finds

Displaying beachcomber finds

Finally I got round to doing something with the beachcombed finds we brought back from holiday in Druridge Bay late last summer. As we started our little hoard and Joss sat playing ‘shell shopkeeper’ on the beach I thought we should bring some home as souvenirs but it wasn’t until we got home and I photographed them that I realised how many we had!

Displaying beachcomber finds

I scoured Pinterest for ideas and settled on a simple glass jar for our bathroom window, TK Maxx came up trumps with this beauty for less than a tenner and I really love how it turned out after some careful curating. I saw lots of other ideas but felt they might detract from the natural beauty of the shells, displaying beachcomber finds is easy if you let the treasures do the talking!

Displaying beachcomber finds

Displaying beachcomber finds

That teeny tiny shell dangling from the top is smaller than my little fingernail and in perfect shape, Joss found it for me and I loved how perfect it stayed despite its tiny size, I may pinch it back and pop a jump ring on it to wear on a necklace from time to time!

Displaying beachcomber finds

So there we have it, happy memories captured to enjoy back home!

Love Bird Valentine

Valentine’s Day is something I’ve always liked, not in a cheesy way, I just have fond memories of my mam buying a special cake or treat for supper on Valentine’s Day and it’s a tradition I’ve always kept to, sometimes baking something for the loves in my life, sometimes just grabbing a treat from the shops after a busy day.
Joss and I have made a Valentine for Daddy this year, sadly she was too excited to keep it a secret but I’ve squirreled it away and I’m sure he’ll have forgotten in a month’s time!

If you’d like to make your own love bird it’s really easy.

Love Bird Valentine

I drew a rough bird shape on white card and cut it out for Joss to decorate.
Once she’d had free reign with the glue, glitter, foam stickers and strips I’d cut from leftover tissue paper wrapping we popped it to one side to dry. This took a long time, Joss LOVES PVA glue!

I took some twine and cut three lengths, one for the hanger which is taped in a loop with washi tape to the back of the bird, and two for the legs, adding a foam shape for feet and again attaching to the back of the decoration.

Finally I cut a rough envelope shape from stiff card to carry the love bird’s valentine message, ‘Daddy x’ and glued this to the bird’s body adding the finishing touch, a googly eye and ta-da, Happy Valentine’s Day Daddy!

valentine

Sensory play at Christmas – feat Hexbug

I think Christmas can be a brilliant time of year for sensory play. Earlier this week Joss and I spent an afternoon with a bowl of water, some ice-cubes and blue food colouring and had an amazing time playing with her plastic sea animals in the water and watching the ice cube ‘icebergs’ melt!

This year these are some of the gifts that Joss will be receiving, bath crayons, foam shapes to stick on the walls of the shower, and foam silly soap all intended to encourage more sensory play.

Image from Magic Toy Shop

Image from Magic Toy Shop

I’ve also bought a set of these sensory tubes for scientific explorations; I’ll be filling them with water, glitter and glue to make sparkly sensory tubes; Joss loves putting things in and out of containers so I know these will be a big hit.

eduzone

Now that she’s getting older I thought about other toys to support her learning. When HEXBUG contacted me about their range of robots for children I was really intrigued! By leveraging their robotics expertise HEXBUG toys launched a Micro Robotic Creatures product line designed to give children a positive experience with robotics at a young age – these are some of the coolest toys I have EVER seen! Look at this Battle Bridge, a brilliant arena for HEXBUG toys robots to interact in.

download

Our childminder has a selection of HEXBUG toys and Joss loved playing with them, so I was only too happy to add a HEXBUG toys review to this sensory play post. The Aquabot range starts at a super reasonable £7.99 for a single Aquabot; a robotic fish that really swims, these totally delight children, and why not, they move with such realistic actions that it’s hard to believe they’re robotic!

We reviewed the Aquabot 2.0; this interactive environment provides the fun experience of having a pet fish, without all the messy clean-up or need to remember to feed the fish, perfect for us and even better Joss can get her hands in and get wet too! The comes pre-set with batteries and spares, and with a small tank and stickers to decorate the environment for the fish! At £14.99 for the Aquabot 2.0 and bowl this makes a great all round gift.

aquabot

The Aquabot encourages kids to let their imaginations run wild as they care for their new pet. After five minutes without activity, the fish goes into sleep mode to conserve battery life, Joss found this utterly fascinating and even more fun as the fish can be awakened by tapping on the tank, and off it goes swimming again!

Other robots in the HEXBUG toys ranges react to light and sound or movement, these are brilliant little toys to introduce children to science and foster a love of engineering too; oh and they’re pretty fun for grown ups too!

Why not think about giving a fun sensory or scientific gift this Christmas?
Disclaimer: We were sent an Aquabot 2.0 for review purposes, all views are our own

Air drying clay at Christmas

I absolutely love air drying clay, it’s really easy to work with and has a really nice finish.

I bought a pack for £2 and started with a project I’ve wanted to do for a while, making a little trinket dish, something I’d seen on Pinterest. Decorated with a sharpie and sprayed with some varnish to finish it off I was really pleased with the results.

Air drying clay at Christmas

Air drying clay at Christmas

I made a few more to give as gifts, then used the leftover clay to make some Christmas tags/ornaments. These probably worked out at less than a quid to make and I’m really happy with the results.

Air drying clay at Christmas

I rolled out the clay to about 5mm thick and cut out the shapes using heart and circle cookie cutters, then I used various stamps including alphabet stamps to emboss designs into the clay (the bobbly designs were printed using a scrap of an old jumper so you don’t need stamps to get a nice result!) A straw was used to pop a circle in the tops so they can be hung on ribbons.

After two days they were dry and ready to sand gently, then paint. I checked on them every so often to check they were still nice and flat, air drying clay can curl so do take care to check on them!

I used metallic paints from Joss’ stash to decorate them, then finished them with a spray of varnish too.

airdrying clay christmas ornaments

Egg Carton Christmas Trees

egg carton christmas trees

Joss and I have been getting crafty most evenings for the last week. After dinner we clear the table and she asks to draw, once she tires of another round of drawing pigs and slugs (it’s always pigs and slugs she draws, I don’t know why!) she usually asks if we can do some painting.

I thought we’d use this time to start to make a few little Christmas decorations together. As I was clearing the kitchen last night I was about to pop the egg carton into the bin when I thought about using it for painting instead. Cutting out the centres of the carton I made some of them taller and some shorter and trimmed any rough edges before letting Joss go crazy on them with the glitter and paint!

Make your own Egg Carton Christmas Trees

If you’d like to make your own egg carton trees here’s the lowdown:

egg carton christmas tree

  • Cut out the pointed centres of your carton, remove any rough edges and prep them for your toddler by cutting them into different sizes.
  • Get decorating with paints, glitter glue and stickers
  • You can either keep them as they are or stack a shorter tree on a taller one as we have done to make them look more ‘tree like’
  • Then either keep as a snowy scene as we’ve done, or pop a little hole in the top with a pencil and add ribbon to make them into ornaments for your Christmas tree.
  • Enjoy!

A Simple Toddler Firework Activity!

simple toddler firework activity

It’s that time of year again, the time when Sarah and Duck’s firework dance is once again carefully choreographed by my tot and we all get the sparklers out!

We’ve had such fun at Joss’ toddler group this morning that I had to share her firework pictures; these are so simple and effective.

Take some black card, oodles of glitter glue and sparkles and let your little one go wild!

A Simple Toddler Firework Activity

You will need:

Black card

Glitter pens

Or glue and glitter

simple toddler fireworks

Let your tot go wild with the glue and glitter, there’s no exact science to fireworks so don’t intervene, just allow them to crack on and get messy!

WP_007133

Once they’ve made the firework designs write their name in glitter glue, then while it’s all still wet sandwich a piece of paper over the top of their picture and rub down hard to spread the glitter and the glue out and help it to hold.

Then peel off the top sheet to leave the sparkly design in place, allow to dry, then display!

Present and Party Life Hacks and Moneysaving Tips

I’ve been invited by Voucher Codes to take part in their Life Hacks challenge and I’m really excited to share my tips with you!

Why present and party life hacks?

I decided that I’d theme my ideas around presents and parties because I think birthdays are such a special occasion that it’s important we treat our loved ones to the personal touch; it’s one area where we save whilst having fun crafting too.

1) Handmade cards and gifts demonstrate that we want to put the time and energy into showing that we care, and these small touches can often mean more to their recipients than big flouncy gestures! This is where life hacks and budget busting tips really come into their own as they’re the gifts that keep on giving, both to the person receiving them and also to your purse!

present and party life hacks

2) This past year all of the gifts I’ve given have been prettily wrapped on a budget. I buy huge, huge rolls of brown paper from our post office for £1.20 for a whopping 30 metres and either cut off sheets which I get Joss to decorate or I use my stamp sets to decorate them myself. A favourite life hack is to get a pencil that comes with an eraser on the end and dip the eraser in paint to stamp cute polka dot paper! This means we can tailor the decoration to each person and don’t have loads of rolls of half used paper around the house.

Present and Party Life Hacks

3) This brings me to my next hack, recycling wrapping paper. I’ve blogged about this before but my favourite tip is to use wrapping paper to make pretty envelopes. Look for a simple template online, print and hey presto, you’ve a sweet little envelope to pop that giftcard into, or to house a homemade greetings card!

Present and Party Life Hacks

4) One of my favourite home organising tips is to keep a wipe clean board in the kitchen to jot down bits and bobs you need from the shops as you finish them, this one was just a quid but it’s so handy. Try to get everyone into the habit of writing on there when they notice the washing up liquid is running out or they’ve just used the last scourer and as you’re washing up or cooking you also have a space to make a note of any random ideas that pop into your head, I often jot down ideas for birthday gifts for people whose celebrations are coming up!

Present and Party Life Hacks

5) When I made these recycled milk bottle elephants it struck me that this could make a great kids party theme; you could have enough bottles washed and pre-cut for little ones to decorate, just pop some glue and crafty bits and bobs out for them, and everyone gets their own recycled Nelly to take home!

Present and Party Life Hacks

6) Keeping on the party theme I settled on a winner when I started making our own birthday cakes, my top tip for tasty bakes is to use value jams and preserves for fillings, this gorgeous lemon curd cake was made with a 59p jar of lemon curd and it was so zingy that I’d definitely use a budget buy again!

7)I also made the little flower decorations with bits and bobs from my cardmaking set, decorated with buttons and stuck onto skewers, this was one seriously thrifty cake!

Present and Party Life Hacks

8) Two more tips from the recycling box, this time using old jars, I like to make party lanterns with mine, simply wash them out and decorate with washi tape, then pop a tea light in and enjoy the glow.

9) Or make party sweetie jars by gluing a small plastic character or animal to the lid and spraypaint, filled with sweeties these would make lovely take home gifts!

Present and Party Life Hacks

Present and Party Life Hacks

10) And finally, one of my favourite hacks uses printable transfer paper, this stuff is great and can be picked up for a couple of quid for two sheets. I used my transfer paper to make affordable personalised gifts like these drawstring toy bags, sometimes I’ll print the recipients name out and iron on the fabric, most recently (pic 5 below) I used a seashell motif with some jazzy striped fabric for a summer seaside feel!

Present and Party Life Hacks

Happy Partying Folks!

Disclaimer: In association with Voucher Codes

Cook Together, Share Together, Laugh Together

Family Friendly Week (formerly Parents’ Week) is a national awareness week run by the Family and Childcare Trust. The aim of the week is to increase recognition of the issues faced by families up and down the country, but also to celebrate the vital contribution families make to society.

Cook Together, Share Together, Laugh Together

The theme for this year’s Family Friendly Week is Cook Together, Share Together, Laugh Together so I thought I’d take this as an opportunity to reflect on our family eating habits, what we enjoy about cooking and sharing meals together, and some of the laughs along the way too.

I’m also reblogging one of our favourite family recipes, a healthy treat for toddlers in the shape of my ‘pack a punch toddler flapjacks’ – they’ve had great feedback from other parents and Joss loves getting involved in making them too!

Cook together

My top tip for cooking with toddlers would be to get them involved from a very early stage, preparing food can be a great sensory activity and can be a good starter for little chats about favourite foods, textures and healthy choices. For example when we make these flapjacks we talk about them being a treat or a snack, include plenty of fruit which I generally leave open to Joss’ choices offering her a range of dried or fresh fruits to add to the mixture, and the last time we made them we talked about the honey we add, and about buzzy bees too!

Share together

Sharing a family meal time is important to us and we like to offer Joss plenty of choice and a say in what we eat too. If I ask her what she’d like for dinner nine times out of ten she will say chicken pasta or sausage, broccoli, carrots and potato (it’s become like a song!) so those evenings I will try to accommodate her choices, or ask her to choose between a few different veggies so she feels she’s contributing too!

Laugh together

Clearly when cooking with a toddler much hilarity ensues, the last time we baked bread together we had to start again as the yeast was tipped onto the floor and when we made a crumble Joss was very interested until I said we’d be having homemade custard and she declared she wanted chicken dinner instead and wouldn’t try the crumble at all! There has to be a light-heartedness about family meals, I always said I didn’t want to have a battle over mealtimes and I think we have a fairly relaxed attitude to it all which helps this along, if it all goes wrong and I cut the toast wrong or can’t stick a banana back together after slicing it the ‘wrong way’ (aren’t toddlers fickle?!) the promise of being allowed to stir something in the kitchen or to play with the dried pasta usually gets things moving along again!

My Low Sugar ‘Pack a Punch’ Toddler Flapjack Bars

rp_index.png

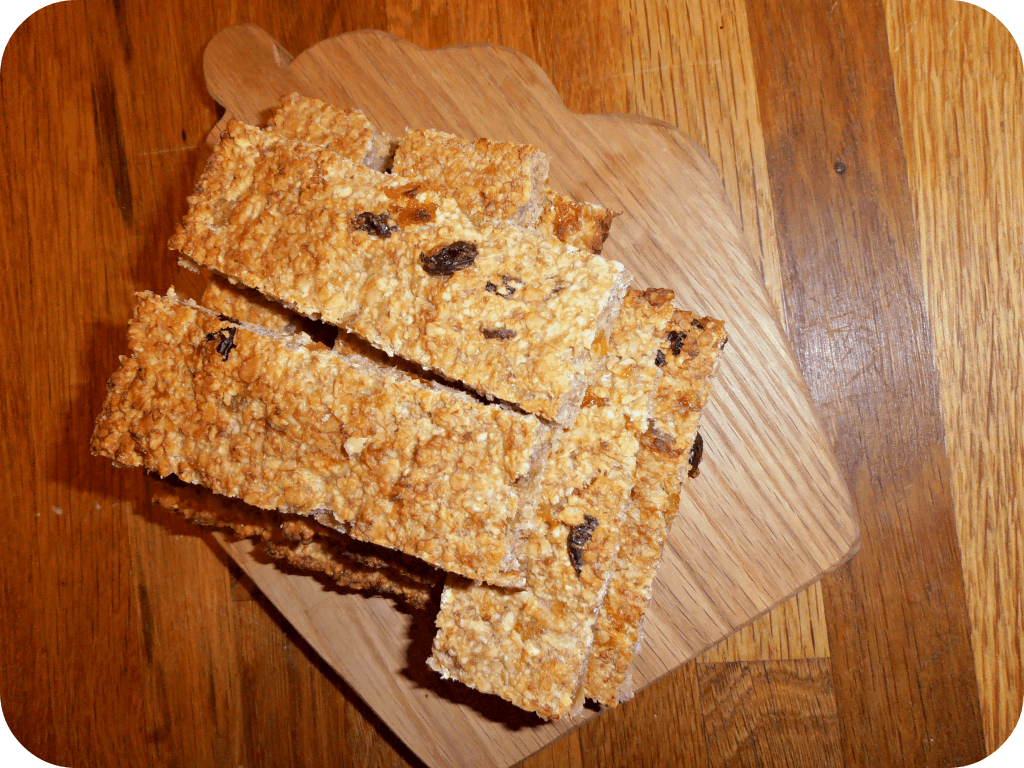
We love to eat these snack bars and adding flour means they hold together with less crumble so they’re really portable too. These are apricot and raisin but they are lovely with dates, prunes or dried berries too! Honey keeps them chewy but can be omitted for even less sugar. Why ‘pack a punch?’ Because they’re chock full of dried fruit and banana to keep you going on a busy day!

Ingredients

100g butter (toddlers could often use the extra fats but you can use light spread for grownups)
100g soft, stoned dried apricots chopped roughly
30g raisins
2 large ripe bananas, mashed
Large tablespoon self raising flour
2 tbsp honey (or fresh apple juice if preferred)
250g porridge oats

Instructions

Preheat oven to 180 degrees.
I make this in one pan, transferring into a silicone tray, if using an ordinary flapjack tray grease with additional butter.
Warm the butter in a saucepan and add the honey or juice, warm gently for a minute to loosen the honey, then turn heat off.
Add the chopped apricots and raisins, and mashed banana and mix well
Measure out the oats and mix self raising flour through them
Tip floury oat mix into the pan and mix well so the oats start to soak the moisture and look golden, the flour should all mix through.

Tip the mix into your flapjack tray and spread out, pressingly gently with the back of a spoon.

Bake for 15-20 minutes or until golden brown

Take out to cool, when cool turn out and slice into bars. Store in an airtight container and eat within 3-4 days.

Enjoy!

So over to you, this Family Friendly Week how are you introducing sharing and laughter into your family meal times?

Milk Bottle Elephant

milk bottle elephants

Need an idea for a rainy afternoon with a toddler now the weather is on the turn? We’re finding the nights drawing in a little tough as we sometimes miss our evening walk and like to have an activity to do instead.

We’ve become a little bored of play doh, drawing and the usual cut and stick and decided to try something a bit different one night this weekend.

Why not join us and raid your own recycling – reuse those empty milk bottles big and small to make a little family of elephants together? Cue terrible pun:

milk bottle elephants 1

I saw this idea on Pinterest for Elmer elephants but Joss is too little to consistently stick on little squares of paper without getting frustrated about sticky fingers. Does anyone else’s little one really love glue but hate it at the same time? So instead we got to work with some stickers, washi tape and googly eyes for an afternoon of crafty fun. I used some decoupage materials and set about making a little Nelly of my own whilst Joss stuck on her buttons and tissue paper!

Instructions for making your milk bottle elephant

If you’d like to make your own milk bottle elephant then grab some milk bottles and lets get started!

YOU’LL NEED:
– Milk bottles
– Scissors
– Glue
– Tissue paper
– Or stickers
– Washi tape
– Pom poms
– Googly eyes

Simply follow these steps to start your own elephant family, use big and small bottles if you have them and just take care to cut any rough edges to smooth them before your little ones get stuck in too.

milk bottle elephant